Teaching your dog to sit is one of the most essential and powerful behaviors you can train. Not only is it a great way to begin obedience work, but it’s also a foundation for good manners, impulse control, and future training success. This guide will walk you through how to teach your dog to sit quickly and effectively using positive reinforcement—a science-based approach that works for dogs of all ages and breeds.
Why “Sit” Matters in Dog Training
“Sit” is more than just a cute trick. It helps your dog learn to stay calm in high-energy situations, like when guests arrive or before crossing a street. It also sets the groundwork for more complex behaviors like “stay,” “heel,” and “wait.”
Teaching your dog to sit:
- Builds focus and attention
- Encourages polite behavior
- Makes future training easier
- Strengthens the dog-human bond
When Marco brought home his 9-week-old Labrador puppy, Bella, she was full of energy and constantly bouncing around. Instead of yelling or forcing her into a sit, Marco used a small piece of chicken and gently raised it above her nose. As Bella looked up, her bottom naturally lowered — the moment she sat, Marco said “Yes!” and gave her the treat.
After just a few short sessions, Bella began sitting automatically whenever she wanted attention. With consistent use of positive reinforcement, Bella learned that sitting calmly = good things happen. No yelling, no pressure — just science-based training that worked fast.
What You’ll Need
- Small, high-value treats (soft and smelly works best)
- A quiet environment with minimal distractions
- Patience and consistency
Optional: A clicker for clicker training
Step-by-Step: How to Teach Your Dog to Sit
Step 1: Get Your Dog’s Attention
Hold a treat close to your dog’s nose. Let them sniff it, but don’t give it to them yet.
Step 2: Lure Into Position
Slowly raise the treat above their head and slightly back over their shoulders. As their eyes follow the treat upward, their natural reaction will be to lower their rear into a sitting position.
Step 3: Mark the Behavior
As soon as their bottom hits the ground, immediately say “Yes!” or click (if using a clicker).
Step 4: Reward
Give them the treat right after marking the behavior. Timing is crucial—your dog needs to connect sitting with getting a reward.
Step 5: Add the Cue
Once your dog is consistently sitting with the lure, begin adding the verbal cue “Sit” just before you use the hand motion.
Step 6: Fade the Lure
Gradually reduce the hand movement so your dog responds to the verbal cue alone.
Step 7: Practice Everywhere
Reinforce “sit” in various environments—kitchen, living room, outside, around distractions. Keep sessions short and positive. If your dog struggles with focus during training, check out our puppy sleep through the night guide to ensure they’re well-rested for learning sessions.

Science Behind the Method
Positive reinforcement works by associating desired behaviors with rewards. When a dog sits and gets a treat, dopamine is released in the brain, reinforcing the likelihood of repeating the behavior. This method is not only humane but also more effective than punishment-based techniques. For comprehensive training approaches, explore our positive reinforcement dog training principles guide.
According to a 2017 study in the Journal of Veterinary Behavior, dogs trained using positive methods showed fewer behavioral problems and were more obedient than those trained using aversive methods.
Common Troubleshooting Tips When Teaching Your Dog to Sit
Even though teaching your dog to sit is one of the most fundamental obedience skills, it’s not always a walk in the park. Some dogs struggle with this cue for a variety of reasons, from distractions to unclear communication. If your pup isn’t quite getting it yet, here are some common issues and how to fix them.
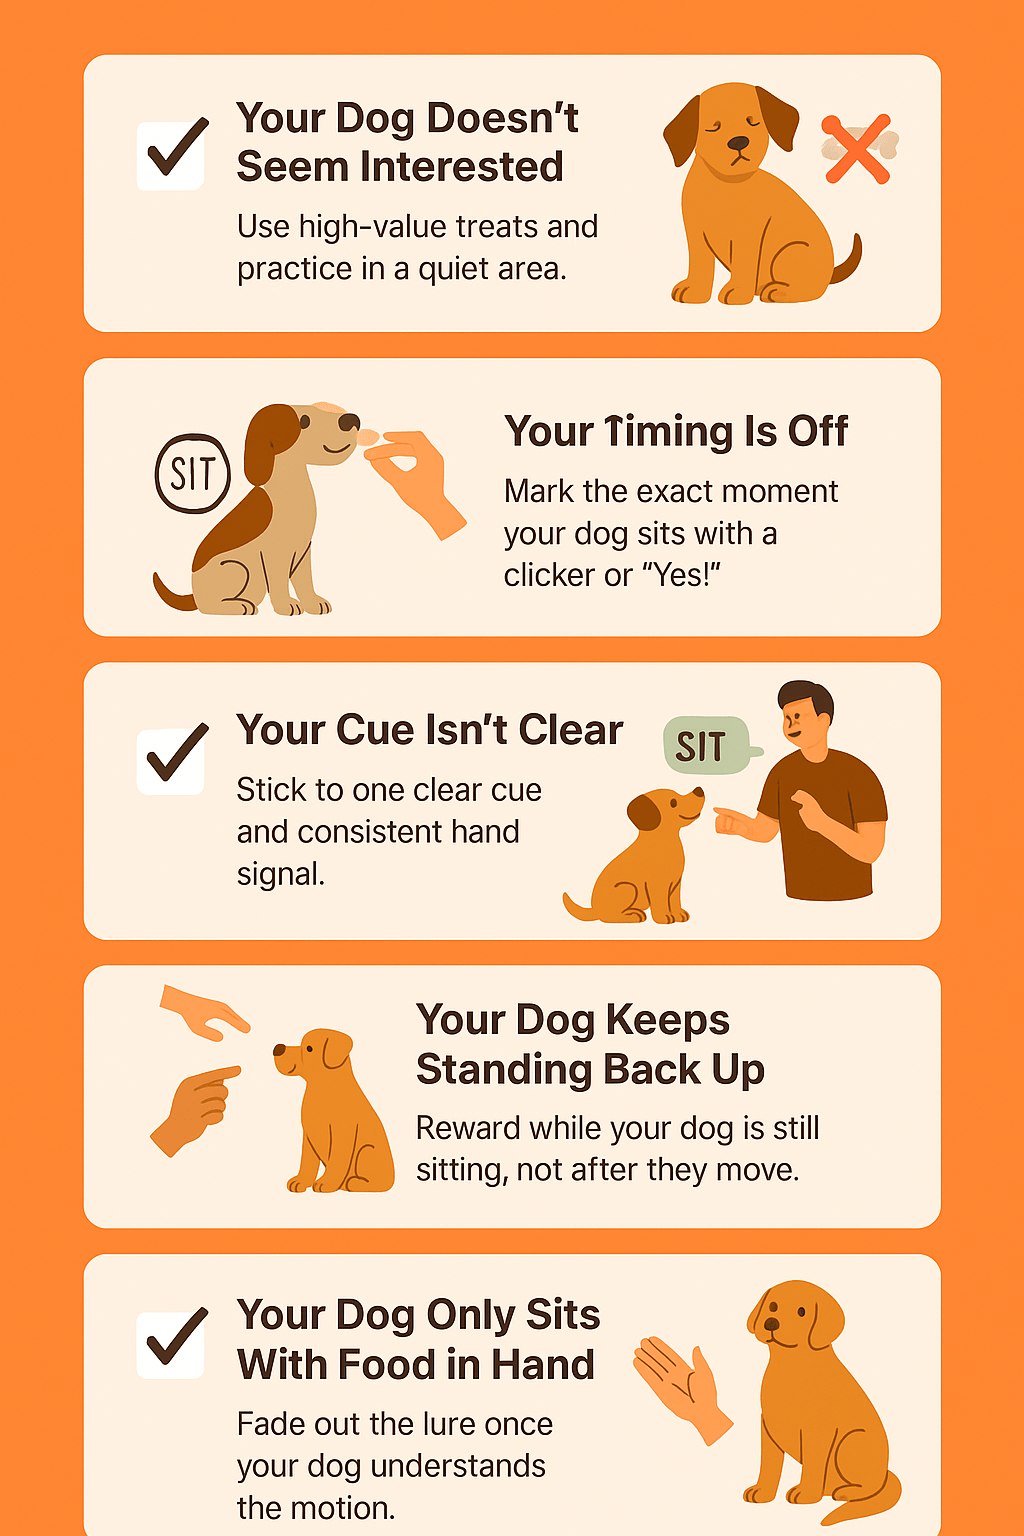
🐾 1. Your Dog Doesn’t Seem Interested
If your dog ignores you during training, the reward may not be motivating enough. High-energy or anxious dogs might also find it hard to focus. Consider implementing crate training to help create a calm learning environment.
Fix it:
- Use high-value treats like freeze-dried liver or tiny bits of cheese.
- Keep training sessions short (2–3 minutes max) and frequent.
- Practice in a quiet environment first, then gradually introduce distractions.
- Remember: teaching your dog to sit should feel rewarding — not frustrating.
Jamie’s dog, Bear, seemed to ignore every “Sit” command — even though Bear had learned it weeks ago. The problem? Jamie was walking across the room to grab a treat *after* Bear sat.
As soon as Jamie switched to keeping a small jar of high-value treats on the coffee table, everything changed. Now, Bear gets rewarded within one second of sitting — and he responds almost every time.
The fix wasn’t about re-teaching the behavior — it was about improving the *timing* of the reward. Teaching your dog to sit is easier when the treat is ready before the cue is given.
🐾 2. Your Timing Is Off
When teaching your dog to sit, timing is everything. If you delay the reward even by a second, your dog might not associate it with the correct behavior.
Fix it:
- Mark the moment their rear touches the ground with a clicker or a firm “Yes!”
- Immediately follow up with a treat to reinforce the connection.
🐾 3. Your Cue Isn’t Clear
Using inconsistent cues or saying them with different tones can confuse your dog. Many pet parents switch between “Sit,” “Siddown,” or even gestures without realizing it.
Fix it:
- Stick with one verbal cue: “Sit.”
- Pair it with a consistent hand signal.
- Everyone in your household should use the same command — consistency is key in teaching your dog to sit effectively.
🐾 4. Your Dog Keeps Standing Back Up
If your dog sits and then immediately stands up, it means they haven’t learned to hold the position yet.
Fix it:
- Reward while your dog is still sitting, not just after.
- Slowly increase the time between the sit and the treat to build duration.
- Add a release cue like “Okay!” to let them know when it’s fine to move again.
🐾 5. Your Dog Only Sits With Food in Hand
A common mistake is luring every time — your dog starts thinking food is the cue.
Fix it:
- Start phasing out the lure once the dog consistently understands the motion.
- Use your empty hand for the gesture and reward from your other hand or pouch.
- Mix up your rewards so your dog sits even when a treat isn’t visible.
🐾 6. Your Dog Sits at Home but Not in Public
If your dog obeys in the kitchen but ignores you at the park, it’s a classic case of context dependency.
Fix it:
- Generalize the behavior by practicing in multiple locations: living room, yard, sidewalk, then pet stores or parks.
- Reintroduce the treat and praise in new environments before fading them out again.
- Gradual exposure = long-term success when teaching your dog to sit anywhere. For dogs that need help with stranger interactions, our stop dog barking at strangers training can be invaluable.
🧠 Remember: Every dog learns at their own pace. Stay patient, stay positive, and celebrate every small win.
When to Use “Sit”
- Before meals
- Before going outside
- When guests arrive
- At street crossings
- During vet visits or grooming
Teaching your dog to sit on cue gives you a powerful tool to manage behavior and communicate clearly with your companion. For dogs that struggle with impulse control, our stop dog barking at night in the crate techniques can complement your sit training.
Sit-Stay Progression: Building Impulse Control in Your Dog
Once your dog has mastered the basic “sit” command, it’s time to add duration and impulse control through sit-stay training. This powerful next step teaches your dog to remain calmly in position until released — a skill that enhances focus, obedience, and safety.
Why Sit-Stay Matters
Sit-stay training strengthens your dog’s self-control and sets the stage for advanced behaviors like “heel,” “place,” and reliable off-leash responses. It also helps prevent common issues like bolting, jumping on guests, or running into the street. For more advanced control techniques, see our how to teach a dog to stay in one place guide.
How to Progress from Sit to Sit-Stay
- Start Small
- Ask your dog to sit.
- Pause for 1–2 seconds before offering a treat and a release cue (e.g., “Okay!”).
- Reward success and repeat, gradually increasing the delay.
- Build Duration Gradually
- Add 3–5 seconds at a time.
- If your dog breaks the stay, calmly reset without scolding.
- Always release before your dog moves — success teaches better than correction.
- Add Distance
- Take a single step back, then return to reward.
- Increase your distance slowly over sessions.
- Keep sessions short and end on success.
- Introduce Distractions
- Begin in a quiet space, then add gentle distractions (toys nearby, doors opening).
- Practice near real-world distractions like doorbells, other dogs, or outdoor environments.
- Always reinforce with high-value treats or praise.
🧠 Learn the Principles Behind the Training
Pro Tip:
Use a consistent release word (“Okay,” “Free,” or “Break”) so your dog clearly understands when the stay ends. This reduces confusion and helps your dog stay seated even when excited.
Final Thoughts
“Sit” is one of the simplest, most effective commands you can teach. With a little time, patience, and positive reinforcement, your dog can master it quickly—and you’ll both enjoy the process. Make training fun, stay consistent, and always end on a high note. If you’re working with a new puppy, our complete puppy training guide for new dog owners provides a comprehensive roadmap for success.
Ready to take it further? Explore our complete guide to positive reinforcement dog training to unlock your dog’s full potential.
Christopher Quinn adopted his first dog, Loki, a spirited Border Collie/Jack Russell mix, after exiting Army service in the summer of 2012. That experience sparked a lifelong passion for canine behavior and positive reinforcement training.
He studied Principles of Dog Training & Behavior at Penn Foster and has since worked with hundreds of dogs from all backgrounds. Over the past two years, Christopher has fostered more than 30 rescue dogs, giving each one a chance at a better life.
Today, he continues to write, teach, and share insights on humane dog training, blending hands-on experience with a decade of dedicated study.